For Dynamics 365, one of the major challenges faced by developers is generating Auto numbers on various entities.
To overcome this, Soluzione IT Services releases the “New Auto Counter” Solution to automate the process of adding counters to the CRM entities. It allows the user to configure a counter for default as well as custom entities. Here, you can put any prefix, suffix, counter zero padding, and specified date formats with auto-numbering.
You can set the initial value of the counter and its incremental value as well. At any point in time, it can be activated or deactivated. You can also provide a Security Role as per the user access in Dynamics CRM, which can be Read Only or Admin Access.
One can configure the Auto counter as per the example given below.
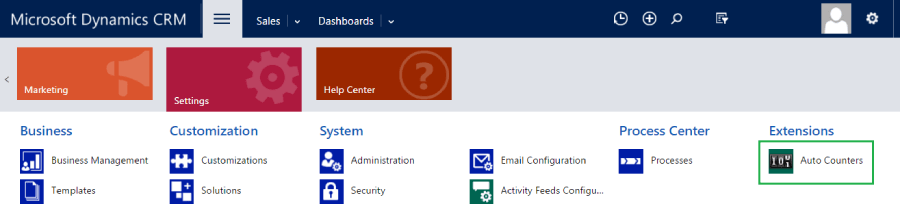
1. Install the Soluzione Auto Counter in Dynamics 365 CRM by importing the managed solution. After it is successfully installed, you should have SolzAutoCounter in your solutions as below.

2. Clicking on the Auto Counter to navigate the sub-grid.
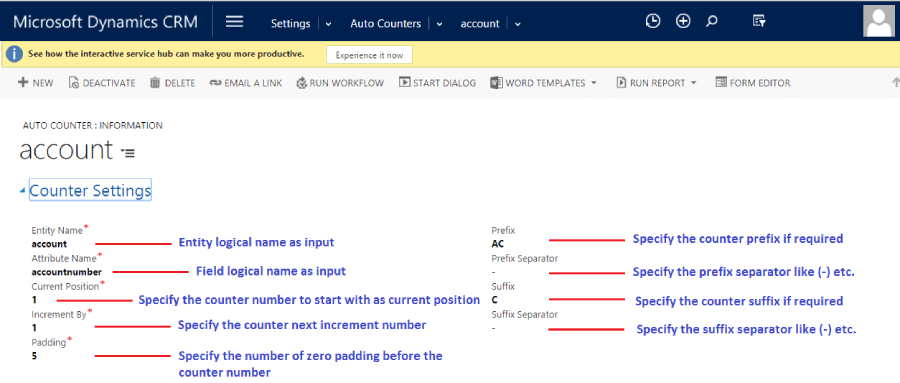
3. Create a new auto counter record to configure the counter settings.
4. Go to Account entity and create a new record and save

Key Features
1.It allows the user to use the auto counter in Dynamic 365 online or on-premises versions.
2.It allows the user to configure the counter for Dynamic 365 default as well as custom entities.
3.Quick create to set the auto counter for any entity.

You can use the following date formats to add as prefix or suffix of the counter
1. Use format “[d]” to Return only date
2.Use format “[m]” to Return only month
3.Use format “[y]” to Return only year
4.Use format “[ddd]” to Return Day First Three Letters
5.Use format “[dddd]” to Return Day Name
6.Use format “[mm]” to Return Month Number In Integer
7.Use format “[mmm]” to Return Month First Three Alphabets
8.Use format “[mmmm]” to Return Month Name
9.Use format “[y]” to Return Year Last Value
10.Use format “[yy]” to Return Year Last Two Value
11.Use format “[yy]” to Return Year Last Three Value
12.Use format “[yyyy]” to Return Year Last Four Value
13.Use format “[yyyyy]” to Return Year Last Five Value
Activate or deactivate counter at any time easily. This will activate or deactivate when the auto counter record is set to activate or deactivated status.

To learn about how we helped Soluzione Client Aspiri with all their Dynamics 365 system,s then find out more here.


March 11, 2025, 10:05
Outstanding post, you have pointed out some wonderful points, I besides conceive this s a very fantastic website.
March 11, 2025, 10:38
Thankyou